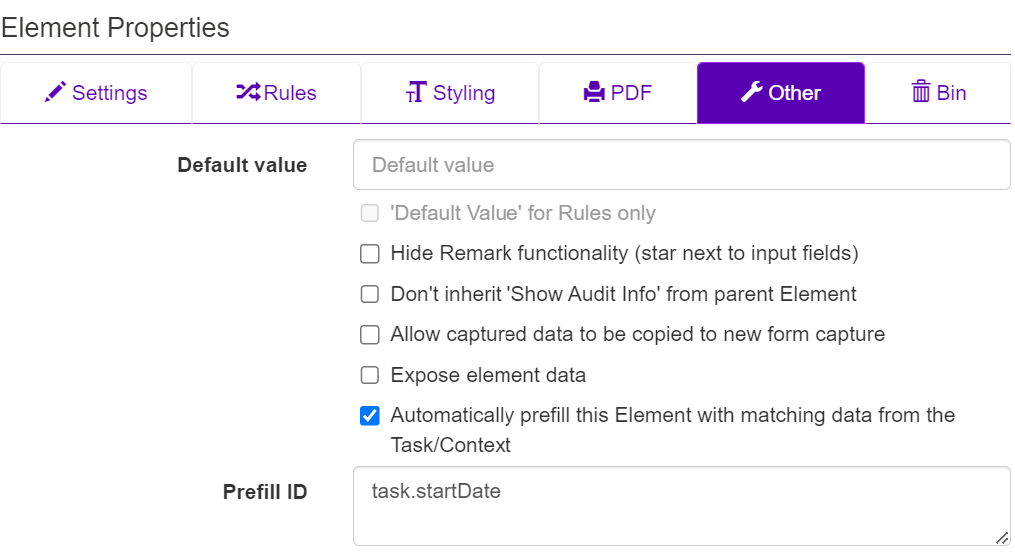
The panel Element Properties shows the editable properties of the element selected in the Elements panel
The Other tab allows you to hide certain features of the element or set a default value. For the Form element you can set several special features in this tab, such as email notifications and allowed form states on the Summary page.

List of element properties
The following is a list of some of the element properties that can be adjusted. Only properties relevant for the element type you have selected are shown in the tabs.
Note! Properties that are only available for the main form element are discussed in Designing: 6.1 The main Form element.
Other tab
Default value
A preset value. When capturing data the value will be displayed in the field, but it can be overwritten.
Default value for rules only
With this parameter the default value entered above will not be shown in the form, but only count in rules and calculations involving this element. We often put a 0 (zero) here in Number or Decimal elements that are addends in a sum, so the sum can be calculated even though the user has not yet entered anything in this element.
Hide Remark functionality (star next to input fields)
As default, all input elements come with a Remark functionality, allowing the user to press ☆ next to the input field to type a remark. This functionality can be switched off for all elements in the main Form element, or for single elements in this setting.
Hide Element in listing of sub elements (e.g. Repeat)
(Shown only for elements in repeats) Normally all elements in a Repeat are presented as columns in the Repeat table. This setting hides the element from the table, and is often used for help texts or intermediary calculations.
Show Audit Info
Audit info can show next to the input field in the form which user has filled in the field and when they did it. If the field is later edited by another user, this person’s name and the time/date will be shown instead. This functionality can be switched on for all elements in the main Form element or set for individual elements. Read more on this in Designing: 6.1 The main Form element.
Note: Audit info is by default printed on the PDF, but from Zegeba v 4.4, there is a new option in the PDF tab where you can select to exclude this info, either for specific elements or for all via the form element.
Allow captured data to be copied to new form capture
In the Zegeba app, users can copy data from an existing report to a new one if this option is selected. Signature, attachment and multimedia elements cannot be copied. The data will only be copied to elements that have the exact same ID as in the original form. In addition, copying has to be enabled in the task template, see Managing: 6.5 Adding Forms to a task template. Copy is performed in the app like this: Using: 4.7 Copying a task form report.
Expose element data
This option is selected when you want to create a data list in the Zegeba app with a column showing the values entered in this element.
Automatically prefill this Element with matching data from the Task/Context
In Zegeba v 4.6 we have introduced a powerful and user-friendly way of setting up prefill from tasks to forms. Just check this option for an element and the system will automatically look for task meta data wit the same ID and fill it in this element.
In the picture above, we want to match the element with ID “date” in the form with the task meta data element “meta.startDate”, so we have entered this in th Prefill ID field. If the task meta data element had the ID “task.date”, we would not have to fill in anything here, as the system would automatically match the form element with ID “date” with the taske metadata element task.date. See Designing: 6.1.1 The main Form element’s Other tab for information on how you ca easily set up such prefill for an entire form.
Autimatic prefill from a task will be introduced in a later version of Zegeba.
Tip: If a Properties input field has “stretch marks” in its bottom right corner, you can drag this corner downwards to expand the field.
