The Dynamic List element looks like a Single Select element with a dropdown list, but with a significant difference: the list of options are fetched from a list file placed in the Dashboard’s Resources, acting as a central register.
The Dynamic List element has two main advantages compared to a Single Select element: One list file can be accessed from many forms. If you for instance have a list of employee names, customers or suppliers, you only need to create the list of names once, instead of entering the names repeatedly in each of your forms. And when the list needs an update, you can enter this in the list file and the changes will be registered in each form after the next sync. This way you can avoid using the Designer every time you need to make a change in a dropdown list.
To design lists to be used in the Dynamic List element you have to have access to the Resources option in the Dashboard. While Form Managers can design forms they do not have this access, and have to ask Admins for help to upload/create a list file and give them the link to the it.
Creating a dynamic list from an existing list
If you already have a list to use in Excel, Word or another type of software you must make a simple version of the list in Excel:

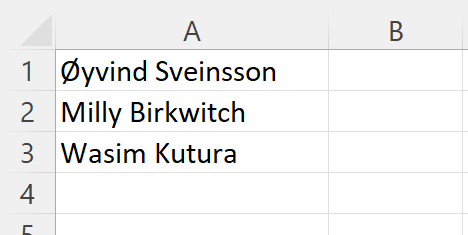
- Create an Excel file with all entries in column A, like in the picture above.
Use no column headings. - Save the Excel file as a .txt file.
- Go to Resources in the Dashboard.
- If you wish, you can first create a separate folder for such lists. Go to that folder.
- Press the top left button “Upload files to disk”, select and upload the list file.
- Click on it to open it and check the content.
The open list should look like the picture below. Its file name is Staff.txt, placed in the folder Data sources.
If needed, you can edit your list in this screen, and press [Save] to the right when you’re done.

Creating a dynamic list from scratch
See the instructions for how you can easily create a .txt list from scratch – or just paste in existing list items – at the end of Designing: 7.1 Managing resources in the Dashboard.
Editing Dynamic list files in Resources
- Go to Resources in the Dashboard.
- Find the list file and click on it to open.
- Change existing lines and add new lines by going to the end of the last line and pressing Enter.
- Press [Save] to the right to save the list.
The users will get the new list in their apps the next time they sync.
Adding a dynamic list to a form
If you wish to add the element to a form version that has existing captures/reports, you must first create a new version of the form and make the changes in this version. Then:
- In Resources, select the list you are going to use and press the Share button to the right to copy its URL address.
- In the Designer, add the Dynamic List element in the Elements pane.
- Enter a label for it, in this case Staff:

- In this element’s Element Properties > Settings,
paste the URL code into the List URL field.
It will then look something like this, except for the word “live” being replaced with your company’s server name:

- You must now insert the following text in front to convert it: https://live.zegeba.com/server/convert-to-dynamic-list/plainText/
(but exchange “live” with the name of your server).
The entire URL should then look something like this:

The Staff Dynamic List element will look like this in the form:

Note: If you would like to have an option called Other or similar, when the user can type in a new name in a text box, it is not as easy to make this in a Dynamic List as in a Single Select list. But you can create an option called “Other” at the end of the list, make a hidden Text Input element below the list element, and create a rule that shows this element if Other is selected by the user.